Monday, May 20, 2013

Chevron Striped Tray- DIY


 I had this little unpainted wooden tray from Michael's, and I wanted to try my hand at a chevron stripe. 

- I painted the outside of the tray yellow and the inside white.

- I used a ruler to make equal squares on the white. I then used the ruler to connect one corner of the square to the other. I used a pencil and my hand kept rubbing, so the white got completely dirty.


- I taped off the stripes that were going to be white, and then painted them. After it dried I did the same for the gray.


-I pulled off the tape and I was disappointed, the tape let a lot of the paint seep through to the white.  

- I wanted clean lines and had no intentions of re-taping the stripes. I used gold glitter to clean up the lines.

It's not my favorite project, but it still looks pretty cute. Now I use it to throw my keys into when I get home, at least it has a purpose. What do you think? 

Adding Fabric to an Old Cabinet


So this is a project that was a project. I purchased a white cabinet from Kmart around 6 or 7 years ago. About 4 years ago I removed the doors, painted it black, and added a curtain where the doors were. I had no use for it after a while, so it got put into storage. 

I was looking for storage to put in my daughter's room, and I remembered the cabinet. 

-I cleaned it up, primered it, and painted the entire thing white (it's original color). 


-Then I took the back to a poster frame, and cut it to the size of the ruined backing on the cabinet.

 - I covered the board with this pretty pink fabric that I bought from a yard sale for $.50, using glue to secure it.


-After it dried, I nailed the fabric board to the back of the shelves.


 It was easy, and basically free since I had most of the materials. How do you think it turned out?

Wednesday, May 8, 2013

Deviant Art

I joined Deviantart.com around 3 years ago, and now I'm ready to actually start using it. 

If you're looking for friends or followers check out my profile....

http://juiceboxadornments.deviantart.com/

Cheers!

Thursday, May 2, 2013

DIY: Vintage Embellishment Meets Shadow Box


For the past couple of weeks I've been helping my parents-in-law go through and pack up their house to move. No small task, seeing how they lived in the home for over 25 years.

I've found so many things to use for my crafting fun, including this sweet little embellishment. I thought it could go great with this old shadow box frame that I've been holding on to for years.


After a little painter's tape, some hot pink spray paint, and a piece of old scrapbooking paper -VoilĂ  - A pretty picture for Charlie's room. What do you think?


Tuesday, March 19, 2013

Time Flies....


Where has all the time gone?

So sad, yet so true. I can't believe that I haven't made a post since April of 2012, but life sometimes swings us in different directions.

I'm back though, and my goal is to turn this blog into something fun and readable. I have new wine charm sets in the works, and I hope to relaunch my Etsy shop as soon as possible. I've been focusing on expanding my inventory, and I've been working on a better way to advertise. I don't know much about networking or Twitter, so any advice you can give me will be accepted with cartwheels and outbursts of happiness.

Monday, April 16, 2012

DIY Owl Plush


My niece Haylee had her second birthday this past month, and I was completely strapped for cash for a gift. I have a three drawer container that is full of different pieces of fabric (all of which only cost $5 from a yard sale), so I decided I’d try my hand in plush-making. An owl seemed to be just the right animal.


Charlie helping Haylee blow out the candles.

I used manila envelopes and paper scraps to draw out the shapes of my pattern. I tried to make it as basic and simple as possible, just cutting out shapes for the body, eyes, belly, and wings.


I secured the eyes, belly, and beak to the front piece of fabric. I sewed all of the features of the owl on before I sewed the body together. I pinned the front and back together inside out and started sewing. I added little wings in the seam, and two flower embellishments to the eyes. I used stuffing from an old unneeded pillow, and hand stitched the final opening shut.

I’m really happy with the finished product, and I think Haylee loved the owl too. She even put on her owl jammies to match her new friend. It was easier than I thought it would be, and I can’t wait to make something else. I now have a special bunny in the works for Charlie, and it’s going to be so awesome.

Thursday, April 12, 2012

Sorry for the Lack of Posts

Sorry my blog hasn't been updated lately, life sometimes just holds you up. I have many things in the works, don't travel too far :)

XOXO

Thursday, March 22, 2012

John's Incredible Pizza


Charlie has been a really good girl lately, so we took her to John’s Incredible Pizza Company for a day of fun. I had never stepped foot in the place before, and was shocked by it’s awesomeness.

Besides having a never-ending variety of pizza, the buffet is stocked full of delicious pasta, salad, and dessert. They’ll make you any pizza you want, and the selection they solidly have is amazing. I tried a nacho pizza that tasted just like nachos! Cool right? The food gets even better as you eat it in one of many themed dining rooms. We stayed away from the cartoon kid room since it was stuffed with birthday party goers, and we still had a few rooms to chose from; Sports room, beach room, cabin room, music fusion room, and I’m pretty sure there were more that I don’t remember. What was better, was the opportunity to eat and then play- then eat some more and play some more. Well worth the price.


The arcade part of John’s was awesome as well. Not only do they have a large selection of games, but they also have rides. Charlie rode her first rollercoaster, it was small but she had a blast. They had a great system for keeping track of credits and tickets. We were given a “Funcard” that is refillable; we could swipe a card instead of carrying a bucket of coins around with us. They even give you the option to have your tickets won put directly on the card, instead of having the ticket strip come out. We of course opted out of that, because what’s an arcade without handfuls of tickets?

Did I mention the life-size claw machine? I didn’t win, but I had fun trying. The claw itself was over half the size of my body! I’m a sucker for claw machines…. I get the fever when playing. I found a normal sized claw machine and went to town on it.  After a couple of failed attempts I got the Domo doll I wanted- Me and Charlie call her Doma since she’s pink! Then with a lucky grab, I got another two prizes in the same claw drop.

We all put in work and ended the day with over 1700 tickets. We picked out a lava lamp for Charlie’s room, and have now vowed to save our tickets up for a electric guitar- 13,000 tickets here we come!

I always thought Chuck E. Cheese was the best, but he may have just met his match…..


Tuesday, March 20, 2012

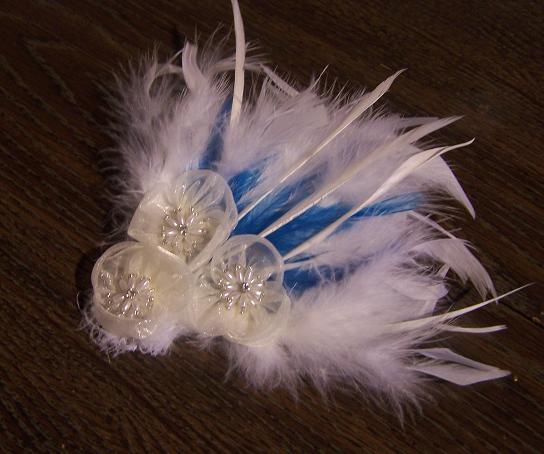
DIY Birdcage Veil and Fascinator


This May in beautiful Aruba, my friend Ashley is getting married. Her fiancĂ© Omar is a long time good friend of my husband, and he has great luck when finding a wife. Ashley has great style, and she’s decided on a beautiful up-do with a birdcage veil and feather fascinator.

She’s pretty crafty so she decided to make it a DIY project, and she invited me to help. We both watched a few tutorials, and she picked up a few materials from the craft store.


Materials:
-Feathers (your choice) he chose soft spinning white and beige feathers with a peacock blue feather undertone.
-3 fabric flowers
-3 rhinestone embellishments
-Stiff felt
-diamond veil fabric
-Fabric covered hair clip
-Hot glue gun
-Scissors
-Needle and thread


We started with the shape of the feathers, and made the cap pattern according to what looked to be the best fit. I cut out a pattern in a drop shape, and transferred it to the stiff felt. After cutting out two exact pieces of the felt, we took turns sewing the hair clip to one of them.

Ashley arranged the bottom layer of feathers in the shape she needed, and we attached them to the other felt using the hot glue gun. She kept designing her layers, and it came together beautifully.

We man-handled the tacky pearls from the fabric flowers, and attached the sparkly embellishments to their centers. Ashley arranged the flowers on the feathers, and we secured them with hot glue.


Ashley threaded a line through the top of the diamond veil piece, after cutting a bit off the sides. She just held and pulled the string through the holes of the fabric, and the veil gathered into the right shape. Finally, we glued the two stiff felt pieces together.  We were finished.


…… Well, finished with the main piece. We used the leftover scrap pieces to shift a feather clip for Charlie. She adores it, and it came out really cute.


Thursday, March 15, 2012

Relax : Wine and a Dino


Just taking a relaxing break from doing the dishes, and folding the laundry. I started a new wine charm set, and he's just the beginning. The little Brachiosaurus is finished as well, and I can't wait to make a Stegosaurus, Triceratops, and a Pterodactyl. 

I'm thinking Star Wars, and possibly an Easter (hooray for Peeps!) set are on the agenda. What do you think should be next?

Sunday, March 11, 2012

Put a Cork in it.....


I've been saving my wine corks for quite a while now, in hopes of using them for a project. I keep throwing them in my utensil drawer, and then I had a painfully simple idea. 

Use them for decorating while I collect- I found an old lidded jar, and just filled it up. I think it looks cute, and now my drawer isn't as cluttered.

Wednesday, March 7, 2012

Trash on My Wall


It was another one of those times.... I was driving, and pulled over when I saw free stuff on the curb. This time it was just two boxes, but I really wanted to know what was inside of them. 

I found this large copper-ish picture with an embossed head of a horse on it. The frame was way worn, there was no glass, the matting was ripped, and the entire thing had some weird clear jelly substance all over it. I took it home anyways. I wish I had a before picture, so you could see how bad it was but I was just interested in getting the jelly stuff out of my house. 

I removed the frame, added a bit of paint and glaze, and put it in a frame. Ta-da! Trash on my walls.... again.... It's probably not the last time either.


Monday, March 5, 2012

Twilight wine charm set - SOLD


It's my favorite part of having an online shop, a sale! I just had my first International customer and they're from Ontario, Canada.

The Twilight wine charm set is gone, but I'm sure I'll have a similar set listed soon. I hope they enjoy them!


Thursday, March 1, 2012

My Craft Blast From the Past


I was cleaning out my closet and I found a bag of some of the old purses I made. I used to have a shop on Ebay for them, but never liked them enough to keep making them. I can't actually sew, I just make it up as I go along. I remember cutting out cardboard shapes, because I don't know how to read sewing patterns. I sold them with a starting bid of $15. I had one of my Johnny Depp Pirate purses have a bid war over it, and sell for over $50. I haven't made a purse in over five years, but I might just start again.....

My friend Sara and my little sister Nikki were always down to model for me.

 I remember the Red dice Marilyn Monroe purse- It was sold to this guy who was the biggest fan I had ever seen, he literally had thousands of Marilyn items. Here's the photo he sent me after he received it....


This was probably my favorite. I had the biggest addiction to Marilyn Monroe when I was younger. The second picture is actually the inside pocket.

 
Inside pocket of the Edward Scissorhands purse

Charlie's Sticker Chart


Charlie has had some issues lately with cleaning her room and sleeping in her own bed. Today we made a sticker chart for her, to maybe put a little fire under her butt to do what she needs to do. We watched an episode of Sid the Science Kid and we were inspired....


Each day she has four jobs:

1. Keep her room clean
2. Be good
3. Brush teeth and hair
4. Sleep in her own bed

She gets to draw a star for each task each day she completes, and if she does well she'll get a sticker for the week. A month that has a sticker each week earns her a trip to the mall to buy a Build-A-Bear. I'll let you know if it works.....